
As long as I’ve been coming to Mexico city, I’ve been impressed with its bikeability. That’s no easy task in a city of 12 million people, who aren’t known for their passive driving.
The things that stuck out to me on my first visit were the free bikes available in the Zocalo, the closing of the downtown core to bicycles on Sundays, and the beginnings of dedicated bike lanes. Since then, things have only gotten better. While you can still use free bikes around the Zocalo, I really love the bike share program that allows you to pick up a bike in one.
The Mexico city Metro system recently replaced their original bike program with brand new bikes that are priced very reasonably. You can opt to pay a one day, three day, or one year subscription. Each one gives you an unlimited number of 45 minute rides for the duration of your subscription. With tons of stations downtown, it’s rarely five minutes from station to station.
Step one: Downloading the app (do this at home before you need the bike)
The first thing to do is to download the EcoBici app and fill in all your personal information. This is much easier if you do it in advance than when you’re standing at a bike station. If you have a Mexico city Metro card, you should link that in the app so that you can use either your card or your phone to rent the bike.
Step two: Choosing a plan
Before you can rent a bike, you must choose a plan using the app. I originally chose the day plan, but after doing that three times, I realized I’d be better off choosing the annual plan, which I did enroll in for the equivalent of $26 US dollars.

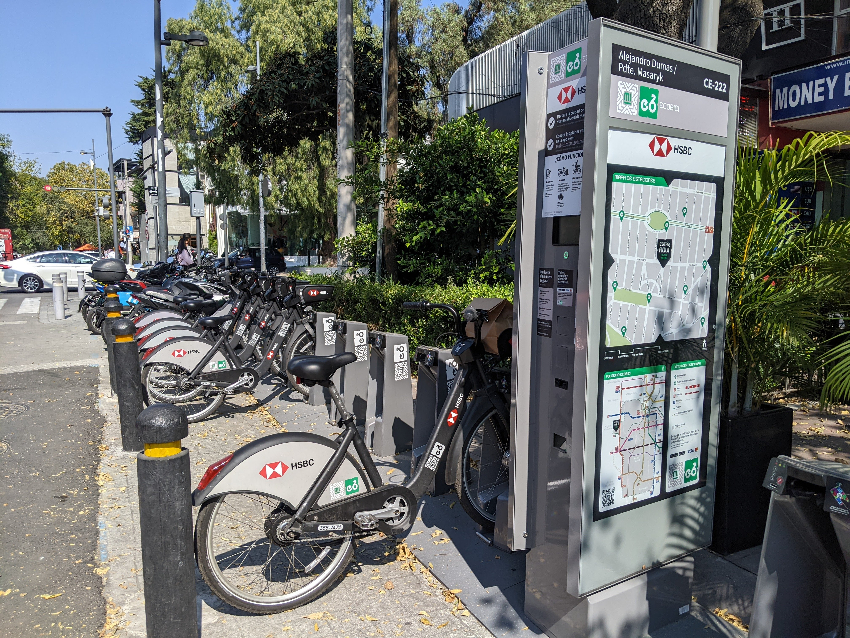
Step three: Unlocking the bike
The first thing I do when choosing a bike is to visually inspect it to make sure it does not have a flat tire or broken components. I also adjust the seat height before initiating the rental so I don’t waste my rental time finding the right height. They make it easy my engraving numbers on the seat post, so if you remember the number you usually adjust to, you can use that on whatever bike you choose.

Once you’ve chosen and paid for your plan, you can rent a bike. You can either tap your Metro card to the reader on the bike dock next to the bike or use the app to scan the QR code. The bike should dislodge from the dock. Be careful since the bike often drops out of the dock and can roll into traffic, depending on the location of the rack.
On occasion, the dock will not release the bike and the red light flashes. This could be because the bike was reported as needing maintenance. Try another one. If that doesn’t work, be sure to check that you have an active plan. There is also the rare occasion where certain docks will not release bikes during festivities.
Step four: Riding the bike
The new bikes have a really nice shifting system that is well labeled on the right grip. Rotate the grip in the direction that is appropriate for whether you are riding flat terrain or up a hill. The gear shifting is seamless, which I find incredible. The brakes are the same as on any bike.

Helmets are required in many parts of Mexico city, but since they’re not provided, I’ve never seen anyone on a bike share bike using one.
You are allowed to check out a bike for 45 minutes for free. If you do not get it into a dock before then, you will begin to accrue charges on top of your subscription fee. This is Mexico so we’re only talking about pesos, but to avoid the charges, simply dock the bike and choose another if you want to continue riding.
The one caveat is that you cannot checkout another bike from the same rack until you’ve waited 5 minutes. For that reason, it’s beneficial to choose a return rack that has plenty of bikes because it would suck if someone else came and took your bike because it was the only one in the rack and you could not access it.
You should familiarize yourself with the app before riding. It will show you where you are on the map and all of the bike stations in the city. The app also shows how many bikes and spaces are available at each station. This is also important because you can’t return your bike to a station that is full.

Step five: Returning your bike
To return your bike, you have to roll it into the dock and make sure it locks to the station. I tend to push it into the dock with a light shove that seems to work. If it docks correctly, you’ll see the green light to the left of the dock. If the light shows red, the bike is not docked properly and charges will continue, as well as your responsibility if someone else takes the bike. Be sure that your bike is docked properly.
You can also check your app which will indicate whether your session is ended. The app also shows you other details about your rental, like distance, time traveled and even calories burned!
Point to point versus excursion riding
The bikes are designed to get you from one destination to another within a 45 minute time frame, whether that’s home from the Metro or from one tourist attraction to another. I have also used it for longer trips. The key is to make sure you can get to another dock within the 45 minutes allotted or pay the late fee.

I noticed that from Polanco, there is a 15 mile bike path running through the city so I rode it in its entirety on two separate occasions. The first day, I headed south into Chapultapec park and then docked my bike near the Constituyentes metro.

The second time, I headed north from Lomas de Chapultapec I switched bikes near Colonia Marina Nacional, finished the bike path near Santa Maria Insurgentes and was able to get to Buenavista Metro before my time expired. Again, the extra charges are not extravagant, so you might just enjoy your ride and bring the bike back when you’re finished.
Using the very affordable bicycle rental program is the way to get around Mexico and stay healthy while doing it!